This is the first post in a new series covering advanced design in Microsoft Office SharePoint Server 2007 (MOSS2007). As with previous Extreme SharePoint Design posts, much of the material will be undocumented, some posts will walk the line on supportability, and some will downright obliterate the line just to show what can be done; therefore, all techniques should be tried first in a test environment and a good backup is always a necessity. Now on to the good stuff!
MOSS2007 takes a radically different approach to rendering pages, due mostly to the integration of Content Management Server features into the product and an ongoing effort on Microsoft’s part to migrate towards a more structured, data-bound architecture (i.e. CAML and XML). Much of what we learned customizing SPS2003 will still be applicable but a great deal of the behind the scenes machinery has changed. A good place to begin learning how to modify MOSS2007 to meet your needs is with default page customizations; changing the structure, appearance, and layout of the default site welcome pages.
Since MOSS2007 is built on ASP.NET 2.0, a solid understanding of master pages is required in order to grasp how site pages are constructed and rendered. A master page (any ASPX page with a .master extension) is nothing more than a template with placeholders for content, much like a regular ASP.NET page that invokes user controls to render content. In .NET 2.0 syntax, these placeholders are implemented using the <ASP:ContentPlaceHolder> tag. Placeholders can be nested, so that a top-level placeholder may have multiple levels of child placeholders, much like a parent DIV can have many nested child DIV’s.
The master page by itself usually contains very little actual content other than headers and navigation – it’s just a framework for one or more layout pages that comprise the body of the page. In MOSS2007, the master page DEFAULT.MASTER, located in WEB SERVER EXTENSIONS\12\TEMPLATE\GLOBAL, defines the standard top header and left navigation layout found throughout the basic site definitions. Unlike SPS2003, where the default page in each site definition contained all the code necessary to render the page, the new site definitions, located in 12\TEMPLATE\SITETEMPLATES, have a DEFAULT.ASPX page that references the master page but contains no actual content. Instead, the default page is built at runtime when the site is created by combining MASTER.DEFAULT with the layout page referenced in the PublishingPageLayout property of the Default.aspx File node of the Modules configuration in ONET.XML (~SiteCollection/_catalogs/masterpage/defaultlayout.aspx for the SPS site definition, which corresponds to 12\TEMPLATE\FEATURES\PORTALLAYOUTS\DEFAULTLAYOUT.ASPX in the server file structure). The combined file is then stored in the Pages list on the top-level site.
DEFAULT.ASPX = MASTER.DEFAULT + DEFAULTLAYOUT.ASPX
When you edit the default page using SharePoint Designer you are actually editing the combined code from two pages – the master page and the layout page. Fortunately, because the default page is stored in a list, the whole ghosting/unghosting issue no longer applies (hooray for that!); however, there is one major drawback – since the page doesn’t actually exist until the site is created, editing it only applies to the current site instance – new sites or subsites based on the same definition will have to edited manually each time they are created. To automate this process, the site definition must be modified in a similar manner to the methods used in SPS2003 but using the new master page methodology. Doing so requires making changes not just to a single default page but both the master and layout pages (we’ll cover creating new site definitions from scratch in a subsequent post).
The layout page works with the default page by specifying what content is to be placed in the placeholder zones using the <ASP:Content> tag and referencing the placeholder id. The page handler process then assigns the content in the layout page, which consists of the HTML markup we are used to seeing in SharePoint pages (server controls, web part zones, etc.), to the proper zone in the default page. The following illustration is a wireframe model of a combined DEFAULT.ASPX page with all the major placeholders, server controls, custom tags, content areas and publishing/web part zones placed in their proper context (click on the image to view it full size):
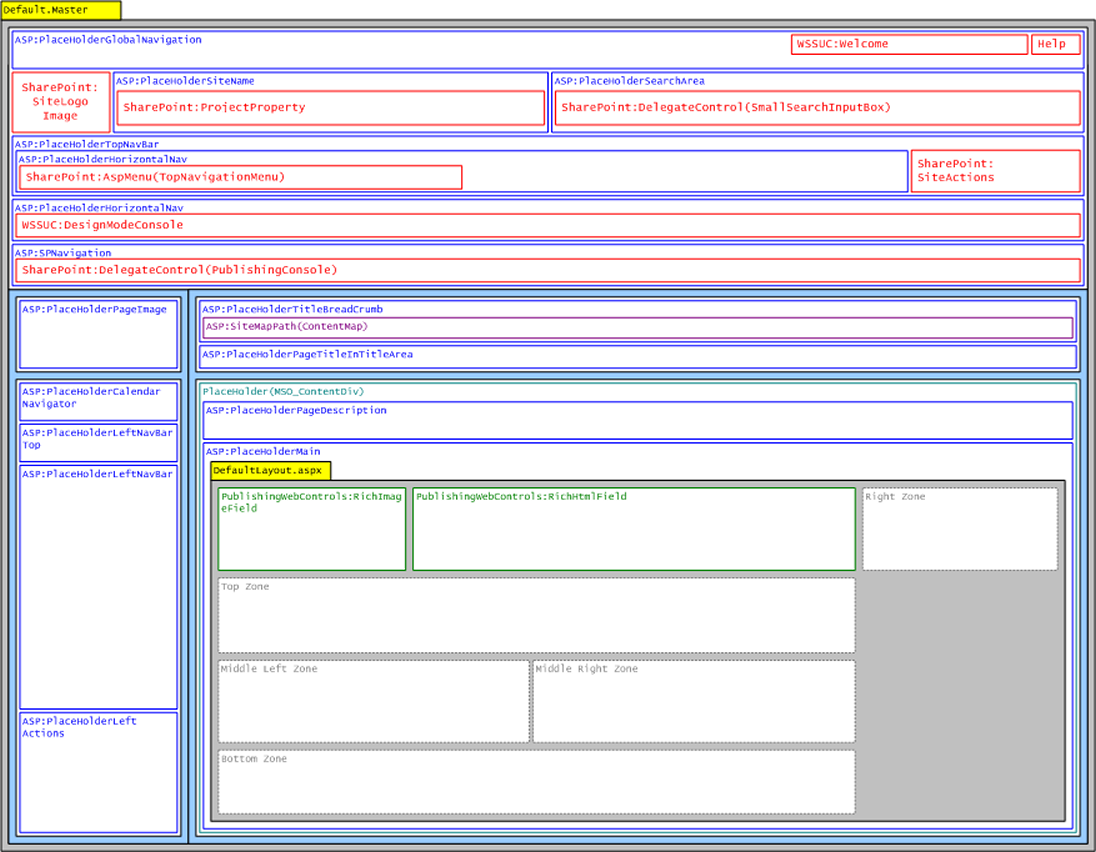
Blue areas in the model indicate placeholders, red is for server/user controls, purple represents new ASP-specific controls (in this case the breadcrumb navigation menu), green indicates the new PublishingWebControls objects, and grey is the standard web part zones. The yellow headers indicate the relationship between the default and layout pages. The final rendered page looks like this:
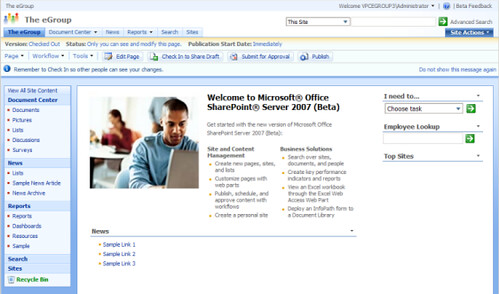
As you can see from the wireframe model, the page layout is not all that different from SPS2003, except that content is now separated from navigation by using two different file types. The beauty of this model is that changes to DEFAULT.MASTER are global; no more cutting and pasting code modifications into multiple site definitions. Likewise, the DEFAULTLAYOUT.ASPX page is also universal, making changes much easier to implement. If, for example, we wished to change the basic layout of the web part zones in the body of the page, we can modify the markup in DEFAULTLAYOUT.ASPX without touching the headers and navigation contained in the master page. We can also add content to the master page by using <ASP:Content> tags and specifying the placeholder with the ContentPlaceHolderId setting without actually modifying the master page itself.
In SPS2003 the customization process was cumbersome and inefficient; with the new master page model, Microsoft has given us far greater flexibility in customizing SharePoint sites to meet each organization’s unique requirements. In subsequent posts we will explore in greater depth the new MOSS2007 architecture, including the new list file structure, the long-overdue changes to the administration pages, and how to create new site definitions from scratch.
Happy SharePointing!
