It's that time of year again - no, I'm not talking about jolly 'ol Saint Nick, annoying crowds at the mall or an XBox in your stocking (hint, hint), this is even better - The eGroup is hiring! If you've got SharePoint development experience and you're itching to work with a dynamic team of fellow SharePoint-crazy codeslingers, mosey on over to our job postings and see if you fit the bill. No, you won't a free Tesla Roadster and you'll have to bring your own Aeron, but you will get to work on exciting client projects using the latest and greatest Microsoft technologies. Give yourself a Christmas present and tell the boss man you're movin' on up!
UPDATE: UK readers take note - we'll be hiring on your side of the pond in the first quarter of '07. We'll be looking for both experienced and junior SharePoint developers so send in your CV if you'll be in the market for a new gig after the first of the year. In fact, if you're in and about London, drop by the SharePoint UK User Group Meet Up on December 14th (you are a memeber, aren't you?) and introduce yourself (I'll be the only 6'5" Texan in the pub - pretty easy bloke to pick out of a crowd).
Monday, November 27, 2006
Monday, October 23, 2006
SPSiteDataQuery vs. GetListItems
Mart Muller over at TamTam posted his thoughts about using the new SPSiteDataQuery object in MOSS 2007 to retrieve items in a document library without tripping over the annoying folder limitations of the much-maligned SPQuery class. This is handy method for getting list data via the object model but it also has some limitations and 'gotchas' to be aware of.
First, when retrieving list data, anecdotal tests have shown (and our experience has proven this to be absolutely true) that the object model is best suited for working with smaller data sets within web parts or controls in small to medium traffic environments (~10,000 users). Why is this? Nobody seems to know for sure but I suspect that it has to do with the overhead related to repeatedly calling the core DLL's that are also performing a number of other concurrent tasks (but I could very well be wrong; the cause may be up for debate but the results speak for themselves).
Second, as Maurice Prather and Bil Simser have pointed out here, here and here, all those SPSite and SPWeb objects you're throwing around in your code don't dispose of themselves - you have to handle that yourself (you are disposing of your garbage, aren't you?). Those little guys riding round on the back of the Garbage Collector truck never see those objects so they don't throw 'em on the rubbish pile - leave a few thousand of those things open and your application pool will come to a screeching halt.
Third, you have to keep a careful eye on that ViewFields element (and don't forget to write your query correctly). A blank value will return all the fields that the records have in common but not any fields that have blank or null values - these are omitted from the results. This is important when you're looking for a particular field only to discover it's not there at all - crash goes your code. Pass in a null value and you get the default view (such as AllItems.aspx) which may not contain any of the fields you're looking for. You have to specify ALL of the fields that you want to appear in the results. And, just to keep you on your toes, make sure to use the DisplayName value of the column in each < FieldRef > node and not the Name value (they are often quite different, especially in custom lists).
Finally, remember that object model methods of this type are always subject to the annoying but ever-present impersonation issue. Call SPSiteDataQuery in the wrong user context and you won't get very far. RevertToSelf, anyone?
Personally, I prefer to use the web services GetListItems() method to get items from a list because a) it's faster (I know, you don't believe me, but it's true - someone somewhere did a performance comparison once but I can't seem to find it again. UPDATE: Found it here but there aren't any hard metrics in the post. UPDATE II: Scroll to the bottom of this post for some very basic metrics), b) I have more granular control over user credentials (I can use an admin account to get the items then check the user perms to verify the access level - no impersonation required), c) the data is returned as an XMLNode object, and d) there's no garbage to worry about - once the TCP connection is closed the memory is released. Most importantly, the web services scale well, especially in shared services environments where you may have one portal context accessing list data from another portal context. That being said, I will probably use the SPSiteDataQuery object in one-off web parts where scalability and performance are not an issue because the code is short and sweet - which is an advantage unto itself, now isn't it?
Thursday, October 19, 2006
New Article on Custom Master Pages
I get a lot of questions from readers and clients regarding deployment of custom master pages in MOSS 2007. There are several ways to tackle this problem and here's a very good place to start - Heather Solomon's new article on How to Create and Store Master Pages on the Server for Use with Site Collections. Heather is one of my all-time favorite MVP's (I swear someday I'm not going to be neck-deep in projects during a SharePoint conference and we'll actually meet in person) and if you're not reading her blog on a regular basis then you're missing out. Go check it out and get those custom master pages going.
Wednesday, October 11, 2006
To < Query > Or Not To < Query >, That Is The CAML Question
If you do any development using SharePoint's web services you've undoubtedly run across the evil CAML beast rearing it's ugly head to devour your nicely structured markup. For instance, if you invoke GetListItems() to retrieve the column values of each item in a list, you have the option of passing in a CAML query to return specific records or a blank value to get the whole enchilada. The SDK is quite helpful, as it documents how this specific query should look. If, for example, you want a particular record with the title "Yellow", provide the following CAML:
<Query><Where><Eq><FieldRef name="Title"><Value Type="Text">Yellow</Value></Eq></Where></Query>
Simple, no? Well, not quite so simple. Try as you might, this query will never return just those items whose Title column is equal to "Yellow". Instead, the web service will happily ignore your fancy little CAML fragment and give you all the records in the list. Alas, no amount of cursing, head beating, keyboard throwing or foot stomping will make it otherwise. I assure you, I have tried all of those methods, and many more, to no avail. What DOES work is simply removing the <Query> and </Query> tags, like so:
<Where><Eq><FieldRef name="Title"><Value Type="Text">Yellow</Value></Eq></Where>
What's that you say? That's not how the SDK says it should be done? You spent hours searching the newsgroups and nobody once mentioned this little bit of CAML trickery? I feel your pain, my friend, believe me, I do. Were it not for my innate stubbornness and determination to beat SharePoint at it's own game, I would have given up on this vexing problem many moons ago. What can I tell you - CAML is a mysterious creature and we know not it's wild and wily ways. Now go ye forth and slay that noxious Query fiend - or at least stab at it until the next time it bites you on the rear!
Thursday, September 28, 2006
MOSS2007 Beta2TR Trials and Tribulations
Today was my lucky day to install a new MOSS2007 Beta2TR virtual machine from scratch. Oh, joy. Has anyone anywhere at any time so far managed to do this without uttering a single curse of frustration? I seriously doubt it. So here are the lessons I learned on today's adventure to MOSS-land:
- If you plan on using a unique admin account (other than 'Administrator') for database access and application pools (such as 'SPSAdministrator') be sure that you are logged in as that account throughout the entire installation, upgrade and configuration process. Otherwise, you'll get all kinds of strange errors during installation and configuration. Oh, and don't forget to add that account to SQL before starting the process with full admin rights (or at least 'dbcreator' and 'securityadmin').
- The slipstream process ain't all it's cracked up to be. I tried three times to slipstream the install, which worked through the installation process (assuming you sorted out the somewhat misleading upgrade instructions), but it failed to create the central admin application upon configuration all three times. What is not quite so obvious is that you need both MOSS and WSS TR's to do the update - just MOSS won't work. This is confusing as you don't need have to install WSS before MOSS the first time around. Just remember to a) copy all the files from the Beta 2 cd image into a local directory, then b) extract the update files for MOSS B2TR and WSS B2TR into that directory's \Update folder.
- Central Administration will not work from a clean slipstream install (at least not for me it wouldn't and I was working from a fresh Win2k3 install). The configuration wizard runs and the central admin app is created but you can't access it - just an annoying 404 error every time. You must first install Beta 2, then run the configuration wizard (which creates the central admin app correctly) THEN run the WSS B2TR followed by the MOSS B2TR.
Finally, after much gnashing of teeth and flailing of limbs, I have a clean MOSS2007 image to work from. Now it's on to custom site definitions which, based on the install experience, promise to be a all-out man vs. machine war. Stay tuned for reports from the battlefield.
Wednesday, September 13, 2006
Business Portals vs. Line of Business Applications
A primary focus of our business is building custom SharePoint-based applications for our clients. Naturally, being SharePoint gearheads, we believe that everything under the sun can somehow be made to work in SharePoint (and we're not often wrong) but we run into a great deal of confusion when presenting clients with various customization options. One of the most difficult ideas to grasp is the separation between a business portal (BP) and a line of business application (LOB). Which is which and where/how do you use each one?
To begin with, a business portal is defined as any application or set of applications (and the default SharePoint experience is really a set of integrated applications) that share a common brand or visual presentation and is usually delivered as a packaged installation (as opposed to a fixed location extranet or intranet) to customers, partners, or other constituents. An LOB, on the other hand, is a distinct application that is deployed within an existing inter/intra/extranet implementation.
On a more technical level, a customized set of WSS site definitions, web parts, and templates that together combine to form a branded collaboration application for, say, the real estate market, would be a business portal. On the other hand, a set of web parts, lists, roll-ups, controls, or other programmatic elements, delivered individually or packaged together, and installed within an existing company intranet for tracking sales and orders, would be an line of business application.
Just to muddy up the waters a bit, it should be pointed out that the two are not mutually exclusive - an LOB can be deployed within a business portal and a business portal can be created to serve internal as opposed to external customers (an IT help desk solution for a company with multiple, independent locations comes to mind). Many organizations start creating LOB's soon after they deploy a new portal solution without realizing that's what they are doing, as they roll out custom web parts that roll-up, consolidate, or provide access to various sources of company data.
Business portals can be a very powerful tool for organizations that need to deliver rich web-enabled applications on a limited budget. WSS provides a comprehensive, flexible, and customizable (and let's not forget FREE!) platform for creating dynamic web applications. The best thing about BP's is that the framework is already in place - navigation, data storage (via lists), security, browser-based site management - so developers can focus on customizing and extending the framework without reinventing the wheel at every turn. With the introduction of SharePoint 2007 and the improved customization options, along with built-in workflow and item-level security, forms-based authentication, and the business data catalog, expect a dramatic upsurge in the number of business portals being created, many of which will be offered as stand-alone applications (hint: expect to see several from us before the end of the year).
Thursday, August 31, 2006
eGroup List Viewer Web Part
Whenever I begin a new portal design engagement, one of the most difficult concepts to communicate to the client's design/architecture group is 'Content-Driven Design'. The theory is simple - create an architecture and taxonomy around the information that is most important within your organization. What makes it difficult is the almost Pavlovian instinct to organize content based on company structure - breaking away from the org chart sometimes requires superhuman effort.
Fortunately, once the initial shock wears off, the light goes on and heads start nodding around the conference table. It doesn't take long for people who couldn't pronounce 'taxonomy' the week before to suddenly become content design experts. This only makes sense, as they already have a picture in their minds of how their company's information should be organized, they just need a push in the right direction to translate those thoughts into a good architectural design.
One of the most critical elements to a good content-driven architecture is the concept of "Author Once, Publish Everywhere". In this model, information is created and managed in the most granular context applicable to it's function but published in the context where it is most often consumed. For example, an HR policy would most likely be created and stored in an HR team site, somewhere within the overall departmental hierarchy. This allows team members to collaborate effectively on documents that pertain to their job function while permitting the greatest degree of security and oversight. Users, on the other hand, shouldn't be poking around in the HR team site, they should be browsing a portal area that is generally classified to contain that type of information (such as 'Employee Resources' or 'New Hire Information').
Unfortunately, this design methodology reveals an inherent weakness in SharePoint - the inability to distribute list content throughout the portal. In the SharePoint structure, lists can only be viewed in the context in which they were created (in our example, the HR documents could only be viewed within the HR team site). SharePoint does not ship with out-of-the-box capabilities to create list items in one area/site and view them in another.
To meet this requirement, we created a web part which allows list content in any area or site to be viewed in another area or site by users with sufficient permissions to view items in the source list (they must at least be a 'Reader'). We've used it in numerous client engagements and it is a critical component in our Content-Driven Design methodology. Just add the web part to a page, give it the portal/site url, list name, and view, set the display options (toolbars and column titles), and voila - list content for everyone, everywhere!
The web part can be downloaded here. The zip file contains a ReadMe document with instructions on installing the CAB file (in case you haven't done it before) along with information on deploying it to a portal/site page and configuring the various options.
As always, post any questions, comments, or suggestions to this post.
Enjoy!

Friday, August 18, 2006
eGroup SharePoint Utilities
I am a big proponent of leveraging SharePoint to deliver enterprise line-of-business applications (LOB's). Much of the custom development we do at The eGroup involves the use of SharePoint lists as data repositories for dashboards, workflows, roll-ups and, of course, LOB's. Working extensively with SharePoint lists brings introduces its own set of challenges - coding against the web services, creating and maintaining a large number of custom views, managing security and migration of list structure/content from development to staging and production.
In the course of developing these applications we have created a set of tools to aid us in our efforts. To save our fellow SharePoint developers some of the headaches we've encountered, and to encourage other developers to contribute their time-saving apps, we'll be releasing various applications and utilities from our toolkit in the coming weeks and months. The first utility, the SharePoint List XML Viewer, received an enthusiastic response and generated a fair number of downloads. I hope it is serving everyone well and we will continue to improve it as we receive feedback from the SharePoint community.
The second tool to be released, the SharePoint List Creator, is a companion utility to the List XML Viewer. Using the XML output gathered from the XML Viewer, it provides developers with the ability to define custom lists in XML and easily deploy them to multiple sites/areas. This can be quite a time saver when you have a large number of heavily customized lists that must be moved to different environments, especially when each portal or site collection exists in disparate server farms and/or separate domains.
To use the SharePoint List Creator you'll need good working knowledge of XML and some CAML experience. Creating a new list requires a source XML file that contains the properties, fields, and views that will comprise the list. A sample file, DocumentLibrary.xml, has been provided in the \XML directory to give you a basic template to work from (remember to store all your custom list templates in this same directory). If you haven't done much CAML or manual list creation, a good first step would be to create a custom list in the SharePoint GUI then view the list structure with the List XML Viewer. Compare the output to the sample xml template and it won't take long to figure out how to create just about any list type from scratch. We'll release more samples in the future to aid new developers and in response to comments/requests.
To use the SharePoint List Creator, first download the eGroup SharePoint Utilities Windows Installer package from our web site. This package contains both the SharePoint List Creator and the SharePoint List XML Viewer. Next, install the MSI on your development machine and launch it from the program menu shortcut. Provide the site/area URL, list name, type, source XML document, and authentication credentials, and submit the changes. The tabs in the utility will display the source XML, new list XML being submitted, the results from the list updates, and the results from the view modifications. You'll also find any errors encountered under the appropriate tab (i.e. if view creation fails, check the "View Results" tab).
We'll update the Utilities suite with new apps as we convert or create them (many are ASP.NET applications that require migration to Windows Forms prior to deployment). As always, please post your questions, suggestions, feature requests, gripes and complaints as comments to the post. Feedback is the only method we have to gauge the community reaction to our efforts. I hope you find the tools useful. Enjoy!

Sunday, August 06, 2006
New Version of SharePoint XML List Viewer
I received some good feedback on the XML List Viewer utility and have posted a new version with the following modifications:
* Clear text entries hidden in password field
* XML displayed in structured view (similar to IE functionality)
* XML can be saved to local file (Right-click within XML field, choose 'Save')
* XML can be printed (Right-click within XML field, choose 'Print')
* XML can be searched for a specified string (right-click, 'Search')
Download the new version (1.1) here.
Please post any additional feature suggestions as comments to this post.
Enjoy!
UPDATE: Downloads from the earlier post had problems with the .NET 1.0 version of the tree view DLL. I have posted an updated version (use the same link above) that includes a recompiled .NET 1.1 version XmlTreeView source code within the executable (thanks to Thomas Siepe for making the source available on The Code Project).
Thursday, August 03, 2006
SharePoint List XML Viewer Utility
Many of us are rejoicing over the new web publishing features in MOSS2007 and the ability to create corporate web sites using SharePoint. Unfortunately, many enterprises are not planning to upgrade to 2007 for quite some time, and those that use SharePoint extensively are looking for ways to derive additional value from their portal investment. One of the best ways to do this is to use SharePoint 2003 as a basic content management system for a public web site (at least until a full 2007 migration can be completed).
I just finished a project where an existing - and very expensive - CMS application (I won't name names but it's not MCMS) is being phased out in favor of using SharePoint lists as the primary method for managing content on a standard ASP/ASP.NET public web site. When you think about, this makes perfect sense - SharePoint provides a form-based web interface for handling content submissions, security is built into the platform, content approvals and basic workflow are easy to implement, and every list in a portal/site is accessible via web services (for more information on using SharePoint as part of a basic CMS application, email me directly).
While working on this project I discovered that working with the SharePoint web services is no picnic; not only do you have to know all their little quirks (like the viewName argument requiring a GUID instead of the display name of the view) but you also have to make allowances in your code for all the funky things SharePoint does behind the scenes with the list XML. For example, when you name a field 'Field1', the list details show the field as just that - Field1 - but when you try to retrieve the list data using the Lists web service, you must refer to the field as 'ows_Field1'. And then there's the ever-popular trick of replacing all spaces in field names with '_x0020_'. Naturally, there are no tools in SharePoint that allow you to retrieve this information, invaluable though it might be. It's enough to drive you mad.
To maintain my sanity and bring some order to web service programming, I created a small utility to retrieve the XML for any list via the SharePoint web services. The SharePoint List XML Viewer is a small Windows app that programmers can use to retrieve the XML output for any list or list items (including any default or custom views) to aid them in building web service applications. You can download it here. Just unzip the file and run the executable. Give it the site/area url, list name, and view name, supply the necessary login credentials, pick which type of XML you want (list data or list items) and - voila - instant XML that can be cut-and-pasted into your favorite text editor.
The SharePoint List XML Viewer Utility isn't anything fancy - it's just a basic utility for developers - but it saved me countless hours programming against SharePoint's web services and I hope it helps you, too. Enjoy!
(Post comments to this post if you have any issues installing and using the tool)
BTW, I recommend using the application along with the CAML Query Builder and Execution Tool from the good folks at U2U. Sooner or later you'll need to execute a query in a web service call and the CAML Builder is the best thing going.
Friday, June 23, 2006
Extreme SharePoint Design 2007: Introduction to Customizing Default Pages
This is the first post in a new series covering advanced design in Microsoft Office SharePoint Server 2007 (MOSS2007). As with previous Extreme SharePoint Design posts, much of the material will be undocumented, some posts will walk the line on supportability, and some will downright obliterate the line just to show what can be done; therefore, all techniques should be tried first in a test environment and a good backup is always a necessity. Now on to the good stuff!
MOSS2007 takes a radically different approach to rendering pages, due mostly to the integration of Content Management Server features into the product and an ongoing effort on Microsoft’s part to migrate towards a more structured, data-bound architecture (i.e. CAML and XML). Much of what we learned customizing SPS2003 will still be applicable but a great deal of the behind the scenes machinery has changed. A good place to begin learning how to modify MOSS2007 to meet your needs is with default page customizations; changing the structure, appearance, and layout of the default site welcome pages.
Since MOSS2007 is built on ASP.NET 2.0, a solid understanding of master pages is required in order to grasp how site pages are constructed and rendered. A master page (any ASPX page with a .master extension) is nothing more than a template with placeholders for content, much like a regular ASP.NET page that invokes user controls to render content. In .NET 2.0 syntax, these placeholders are implemented using the <ASP:ContentPlaceHolder> tag. Placeholders can be nested, so that a top-level placeholder may have multiple levels of child placeholders, much like a parent DIV can have many nested child DIV’s.
The master page by itself usually contains very little actual content other than headers and navigation – it’s just a framework for one or more layout pages that comprise the body of the page. In MOSS2007, the master page DEFAULT.MASTER, located in WEB SERVER EXTENSIONS\12\TEMPLATE\GLOBAL, defines the standard top header and left navigation layout found throughout the basic site definitions. Unlike SPS2003, where the default page in each site definition contained all the code necessary to render the page, the new site definitions, located in 12\TEMPLATE\SITETEMPLATES, have a DEFAULT.ASPX page that references the master page but contains no actual content. Instead, the default page is built at runtime when the site is created by combining MASTER.DEFAULT with the layout page referenced in the PublishingPageLayout property of the Default.aspx File node of the Modules configuration in ONET.XML (~SiteCollection/_catalogs/masterpage/defaultlayout.aspx for the SPS site definition, which corresponds to 12\TEMPLATE\FEATURES\PORTALLAYOUTS\DEFAULTLAYOUT.ASPX in the server file structure). The combined file is then stored in the Pages list on the top-level site.
DEFAULT.ASPX = MASTER.DEFAULT + DEFAULTLAYOUT.ASPX
When you edit the default page using SharePoint Designer you are actually editing the combined code from two pages – the master page and the layout page. Fortunately, because the default page is stored in a list, the whole ghosting/unghosting issue no longer applies (hooray for that!); however, there is one major drawback – since the page doesn’t actually exist until the site is created, editing it only applies to the current site instance – new sites or subsites based on the same definition will have to edited manually each time they are created. To automate this process, the site definition must be modified in a similar manner to the methods used in SPS2003 but using the new master page methodology. Doing so requires making changes not just to a single default page but both the master and layout pages (we’ll cover creating new site definitions from scratch in a subsequent post).
The layout page works with the default page by specifying what content is to be placed in the placeholder zones using the <ASP:Content> tag and referencing the placeholder id. The page handler process then assigns the content in the layout page, which consists of the HTML markup we are used to seeing in SharePoint pages (server controls, web part zones, etc.), to the proper zone in the default page. The following illustration is a wireframe model of a combined DEFAULT.ASPX page with all the major placeholders, server controls, custom tags, content areas and publishing/web part zones placed in their proper context (click on the image to view it full size):
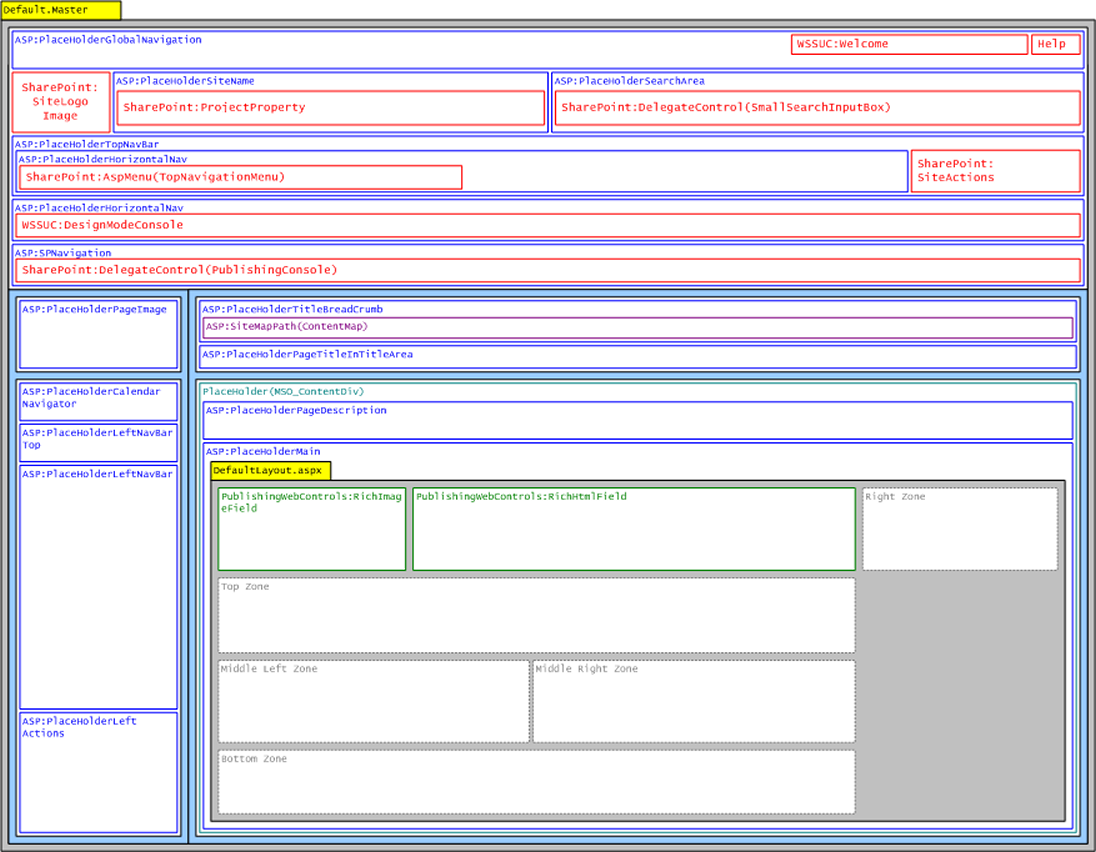
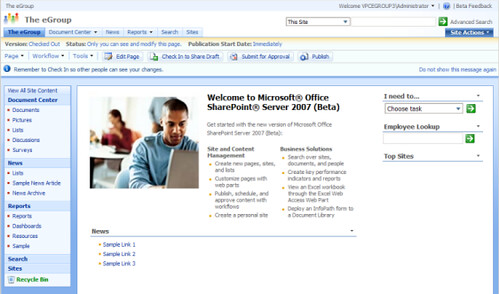
Blue areas in the model indicate placeholders, red is for server/user controls, purple represents new ASP-specific controls (in this case the breadcrumb navigation menu), green indicates the new PublishingWebControls objects, and grey is the standard web part zones. The yellow headers indicate the relationship between the default and layout pages. The final rendered page looks like this:
As you can see from the wireframe model, the page layout is not all that different from SPS2003, except that content is now separated from navigation by using two different file types. The beauty of this model is that changes to DEFAULT.MASTER are global; no more cutting and pasting code modifications into multiple site definitions. Likewise, the DEFAULTLAYOUT.ASPX page is also universal, making changes much easier to implement. If, for example, we wished to change the basic layout of the web part zones in the body of the page, we can modify the markup in DEFAULTLAYOUT.ASPX without touching the headers and navigation contained in the master page. We can also add content to the master page by using <ASP:Content> tags and specifying the placeholder with the ContentPlaceHolderId setting without actually modifying the master page itself.
In SPS2003 the customization process was cumbersome and inefficient; with the new master page model, Microsoft has given us far greater flexibility in customizing SharePoint sites to meet each organization’s unique requirements. In subsequent posts we will explore in greater depth the new MOSS2007 architecture, including the new list file structure, the long-overdue changes to the administration pages, and how to create new site definitions from scratch.
Happy SharePointing!

Wednesday, June 07, 2006
Extreme SharePoint Design: Using the AlternateHeader Property in WSS
I’ve done a number of customizations to administration pages (.aspx files located in the \LAYOUTS\1033 directory) by directly modifying the pages themselves. This is a cumbersome process, involving a lot of HTML search-and-replace operations. I felt it was time to use a more flexible approach so I attempted to create a more robust solution that works in both SPS and WSS. The first challenge to overcome was the fact that pages in a WSS context don’t inherit the AlternateHeader property from the Site Definition ONET.XML file. In the portal definitions, the following setting points the administration pages to a file called ‘PortalHeader.aspx’ and, if the file is not empty, renders the header contained therein:
< title="Team Web Site" listdir="Lists" ows="Microsoft SharePoint" alternateheader="PortalHeader.aspx" disablewebdesignfeatures="wdfbackup; wdfrestore; wdfpackageimport; wdfpackageexport; wdfthemeweb; wdfthemepage; wdfnavigationbars; wdfnavigationview; wdfpublishview; wdfpublishselectedfile; wdfNewSubSite">
This setting does not exist in the STS definition so it must be added (note that this will have no effect on existing WSS sites, only new ones created after the ONET.XML file has been modified). Unfortunately, the default PortalHeader.aspx file contains a number of < SPSWC: > control references which are portal-specific and will not render in a WSS context; simply adding this setting will not solve the problem. So the first step is to edit the ONET.XML file in TEMPLATE\1033\STS\XML to include the AlternateHeader setting and point it to a new header file, as follows:
Original code:
< title="Team Web Site" listdir="Lists" ows="Microsoft SharePoint">
Replacement code:
< title="Team Web Site" listdir="Lists" ows="Microsoft SharePoint" alternateheader="STSHeader.aspx">
Next, the new header file must be created (STSHeader.aspx in this example). This file must contain the proper WSS-context registrations to enable code execution (if necessary) and the content must be devoid of any portal-specific control references. Here is a sample STSHeader.aspx file:
< % @ Page language="C#" % >
< % @ Register Tagprefix="SharePoint" Namespace="Microsoft.SharePoint.WebControls" Assembly="Microsoft.SharePoint, Version=11.0.0.0, Culture=neutral, PublicKeyToken=71e9bce111e9429c" % >
< % @ Register Tagprefix="Utilities" Namespace="Microsoft.SharePoint.Utilities" Assembly="Microsoft.SharePoint, Version=11.0.0.0, Culture=neutral, PublicKeyToken=71e9bce111e9429c" % >
< % @ Import Namespace="Microsoft.SharePoint" % >
< % @ Register Tagprefix="WebPartPages" Namespace="Microsoft.SharePoint.WebPartPages" Assembly="Microsoft.SharePoint, Version=11.0.0.0, Culture=neutral, PublicKeyToken=71e9bce111e9429c" % >
< link rel="'stylesheet'" type="'text/css'" href="'/_layouts/1033/styles/custom.css'">
< table width="100%" cellpadding="0" cellspacing="0" border="0">
< tr >
< td width="100%">
< div class="spsHeader" >
< !-- Insert Header HTML Here -- >
< % Execute Some ASP.NET Code Here % >
< /div >
< /td >
< /tr >
< /table >
After modifying the ONET.XML file and creating the new header file, copy ONET.XML to its original location and place the new header file in the \LAYOUTS\1033 directory. Perform and IISRESET on the server and create a new WSS site. Next select ‘Documents and Lists’ or ‘Create’ from the menu to see your new header code in action. If you plan to utilize custom server controls within the header file be sure to add the necessary registrations to the top of the page prior to deployment.
Tuesday, June 06, 2006
Ajax/Atlas in SharePoint?
A colleague of mine is trying to get Ajax/Atlas assemblies working in SharePoint. All is good if he hard-codes the functionality but the SharePoint safe mode parser is kicking the code out anytime he tries to use the precompiled assemblies. Anyone have experience with this? Post a comment and throw a fellow code monkey a banana or two!
Thursday, May 25, 2006
Enabling the 'Edit in Microsoft Word' Functionality for Office 2000/XP Users
Ever since SharePoint v2 was released organizations have struggled with the Office 2003-dependent features of the product. The primary source of frustration are those functions that should work for all users but don’t – like the ‘Edit in [Application]’ link in document libraries. Users with Office 2000/XP get the dreaded “” error when trying to access files using this option, while Office 2003 users can continue working without interruption. While there are several workarounds for this missing functionality, all of them require Office 2000/XP users to perform different steps to access a document than those users who have Office 2003 installed on their system.
Fortunately, there is a way to overcome this problem. The ‘Edit in …’ option is exposed in the core JavaScript file OWS.JS located in the 60\TEMPLATE\LAYOUTS\1033 folder on each front-end web server. On or about line 1440 is the following function:
function editDocumentWithProgID2(strDocument, varProgID, varEditor)
{
var objEditor;
if (strDocument.charAt(0) == "/" strDocument.substr(0,3).toLowerCase() == "%2f")
strDocument = document.location.protocol + "//" + document.location.host + strDocument;
try
{
objEditor = new ActiveXObject(varEditor + ".2");
if (!objEditor.EditDocument2(window, strDocument, varProgID))
alert(L_EditDocumentRuntimeError_Text);
window.onfocus = RefreshOnNextFocus;
return;
}
catch (e)
{
}
try
{
objEditor = new ActiveXObject(varEditor + ".1");
window.onfocus = null;
if (SzExtension(strDocument) == "ppt" && varProgID == "")
varProgID = "PowerPoint.Slide";
if (!objEditor.EditDocument(strDocument, varProgID))
alert(L_EditDocumentRuntimeError_Text);
SetWindowRefreshOnFocus();
return;
}
catch (e)
{
alert(L_EditDocumentProgIDError_Text);
}
}
This function takes three parameters that define the document’s location, program ID, and the application which created it. The critical code in this function is found within the two Try…Catch blocks starting on line 1445. The first block applies to Office 2003 users (the “.2” designation appended to the variable varEditor indicates O2K3 clients), while the second is applicable to Office 2000/XP clients. This is the portion of the function that must be altered to enable the ‘Edit in …’ option for these users.
The original code identifies the application type and determines the correct application to launch based on settings in the DOCICON.XML file. For Office 2000/XP clients, the script must instead contain an explicit mapping between file extension and application (UPDATE: There is a way to parse the DOCICON.XML file dynamically to achieve these results but the code is lengthy and cumbersome – the performance trade-offs are probably not worth the effort). To achieve this, simply add a series of if…else if statements to the beginning of the second block for each file type:
if (SzExtension(strDocument) == "doc")
{
objEditor = new ActiveXObject("Word.Application");
objEditor.Visible = true;
objEditor.Documents.Open(strDocument);
}
else if (SzExtension(strDocument) == "xls")
{
objEditor = new ActiveXObject("Excel.Application");
objEditor.Visible = true;
objEditor.Workbooks.Open(strDocument);
}
else if (SzExtension(strDocument) == "ppt")
{
objEditor = new ActiveXObject("PowerPoint.Application");
objEditor.Visible = true;
objEditor.Presentations.Open(strDocument);
}
else if (SzExtension(strDocument) == "vsd")
{
objEditor = new ActiveXObject("Visio.Application");
objEditor.Visible = true;
objEditor.Presentations.Open(strDocument);
}
else
{
objEditor = new ActiveXObject(varEditor + ".1");
window.onfocus = null;
if (SzExtension(strDocument) == "ppt" && varProgID == "")
varProgID = "PowerPoint.Slide";
if (!objEditor.EditDocument(strDocument, varProgID))
alert(L_EditDocumentRuntimeError_Text);
}
SetWindowRefreshOnFocus();
return;
The script will now check the file extension when the ‘Edit in …’ option is clicked and, if it matches one of the ‘if’ or ‘else if’ statements, open the associated application and load the file. For compatibility, the original code is retained in the final ‘else’ statement. Also, the SetWindowRefreshOnFocus() and return lines have been moved to the end of the function so they remain applicable to the entire function (if not relocated, the window will remain in a wait state after the ActiveX object has been invoked).
There are a couple of caveats to this solution:
1. Each file type must be explicitly declared in the ‘if…else if’ statements. This can be overcome by instead parsing the DOCICON.XML file; however, as noted above this method is a bit cumbersome and the XML settings are not comprehensive (many of the mappings call SharePoint.OpenDocuments instead of the original application, so a clunky series of substitutions must still be made to be effective; overall, this solution is less efficient than simply making the declarations in the code itself).
2. If the SPS Area/WSS site is not in the user’s Intranet zone in IE and the ‘Initialize and script ActiveX controls not marked as safe’ option is not set to ‘Enable’, the user will get a warning dialog each time they select the ‘Edit in …’ option. For organizations that make use of policy files and/or login scripts, these settings can be enabled globally via a policy file on login.
While this is not a substitute for upgrading all Office 2000/XP clients to Office 2003 (users on the older platforms still won’t have the Explorer View functionality or be able to upload multiple files), it will serve as an effective interim measure until the upgrade process can be completed. Afterwards, the script can be reverted back to its original state and the workaround code removed.
Tuesday, May 23, 2006
Extreme SharePoint Design: Hiding List Types in Existing Sites/Areas
It can sometimes be necessary to disable a certain list type within a WSS site or SPS portal area. If, for example, the customer doesn’t wish to provide portal users with the capability to create discussions, that list type should be removed from the list creation page. If you have not already deployed the portal or team site, removing the list is as simple as editing the ONET.XML file for the site definition. But what if you have already deployed a number of sites or areas? Modifying ONET will have no impact on sites or areas that have already been created – only new ones created after the change takes place. To remove a list type from an existing site/area you’ll need to directly modify the list display and creation pages to remove the list type from view.
In this example we’ll hide the Dicussion Board list type. Begin by removing the display of the list type from the Documents and Lists page (spsviewlsts.aspx in SPS and viewlsts.aspx in WSS – BE SURE TO BACK UP ALL FILES BEFORE MODIFYING THEM IN ANY WAY). Both files can be found in the /60/TEMPLATE/LAYOUTS/1033 folder on the front-end web server(s). On or about Lines 166 - 172 (viewlsts.aspx) or Line 175 - 181 (spsviewlsts.aspx) you will find the following block of code:
ArrayList rgDiscussions = new ArrayList();
rgRgs.Add(SPBaseType.DiscussionBoard);
rgRgs.Add(SPListTemplateType.InvalidType);
rgRgs.Add(L_szDisc_Text);
if (!bBaseTypeInited) { rgRgs.Add(L_szNoDisc_Text); } else { rgRgs.Add(L_szNoDisc1_Text); };
rgRgs.Add("?BaseType="+Convert.ToInt32(SPBaseType.DiscussionBoard));
rgRgs.Add(rgDiscussions);
Remove all but the first line of this code by closing the code block then commenting out the remainder of the text:
ArrayList rgDiscussions = new ArrayList();
%>
<!--
rgRgs.Add(SPBaseType.DiscussionBoard);
rgRgs.Add(SPListTemplateType.InvalidType);
rgRgs.Add(L_szDisc_Text);
if (!bBaseTypeInited) { rgRgs.Add(L_szNoDisc_Text); } else { rgRgs.Add(L_szNoDisc1_Text); };
rgRgs.Add("?BaseType="+Convert.ToInt32(SPBaseType.DiscussionBoard));
rgRgs.Add(rgDiscussions);
-->
<%
This will prevent any existing Discussions from being displayed on the Documents and Lists page. It is important to leave the first line intact so the dependent code that relies upon the rgDiscussions array does not throw an error.
Next, perform the same edits on the WSS (create.aspx, lines 194 - 200) and SPS (spscreate.aspx, lines 199 - 205) list creation pages. Save all four pages to their original location (no reset required) and view them in your browser (/_layouts/1033/{filename}.aspx for each site/area). The Discussion Board group is now hidden from view.
There is one caveat: users with sufficient knowledge of SharePoint can still create and view the list type you have hidden by using the URL protocol. For example, the URL to create a new Discussion Board is http://{portal name}/_layouts/1033/new.aspx?ListTemplate= 108&ListBaseType=3 and the list can still be viewed at /Lists/{ListName}/AllItems.aspx; however, for the vast majority of users this method will be sufficient to prevent them from utilizing the hidden list type. It would also be a good idea to delete any existing lists of that type (if possible); or, at least remove any web parts or links that refer to them.
Tuesday, May 16, 2006
SharePoint Forums Released
Sometimes, you just gotta put down your coffee, get up from your computer and dance a little jig. Today is one of those days. Bil Simser has officially released his new SharePoint Forums web parts. And there was much rejoicing and dancing in the streets (there was at my desk, anyway).
Seriously, everyone who has worked with SharePoint for even a day knows what a pain the built-in discussion boards can be. We all owe Bil a debt of gratitude for solving this problem AND making it freely available to the community.
So what are you waiting for? Go get ‘em!
Seriously, everyone who has worked with SharePoint for even a day knows what a pain the built-in discussion boards can be. We all owe Bil a debt of gratitude for solving this problem AND making it freely available to the community.
So what are you waiting for? Go get ‘em!
Wednesday, May 10, 2006
SharePoint Resources
Joris Poelmans (JOPX) has an updated list of SharePoint resources, including some great stuff for MOSS 2007. Check it out!
Tuesday, May 02, 2006
MOSS 2007 Upgrade Article
I get a lot of questions regarding upgrading from SPS 2003 to MOSS 2007. So far, there has been very little information on this topic, but Joel Oleson just posted a good article on some of the upgrade options. I am intrigued by the scan option to identify customized sites/pages in a portal but I have a feeling that heavily customized sites (which most of my clients demand) are still going to be a painful process to upgrade.
On that note, if you are doing heavy customizations to site definitions and templates, it's always a good idea to warn the client up front that they will have to re-invest heavily in the upgrade when 2007 ships so they can budget accordingly. As a personal rule of of thumb I try to always present the 'doomsday' scenario as part of the upgrade discussion, meaning for every dollar the client invests today in customizations they should plan on at least a 100% matching investment to upgrade. That might be a bit over the top but personally I'd rather give them the bad news up front so they can make better decisions down the stretch.
On that note, if you are doing heavy customizations to site definitions and templates, it's always a good idea to warn the client up front that they will have to re-invest heavily in the upgrade when 2007 ships so they can budget accordingly. As a personal rule of of thumb I try to always present the 'doomsday' scenario as part of the upgrade discussion, meaning for every dollar the client invests today in customizations they should plan on at least a 100% matching investment to upgrade. That might be a bit over the top but personally I'd rather give them the bad news up front so they can make better decisions down the stretch.
SharePoint Developer Guidelines
One of the most common mistakes I see new SharePoint developers make is that they jump right into Visual Studio and start writing code without any real knowledge of the environment their applications will be deployed in. They throw together some code, deploy it within a limited context (usually in WSS) on a local machine, do all their testing with an admin account, and then declare themselves to be SharePoint developers. While this sort of slap-dash approach may be fine if you’re just trying to figure the object model out, it creates bad coding habits that will cause all sorts of headaches the first time your web parts are deployed in an enterprise portal environment.
Here are a few guidelines for producing better code, in less time, with more positive long-term results:
1. Learn the Product
To begin with, developers should understand SharePoint before trying to create the next great web part that changes the world as we know it. Investing the time to learn how portal areas are different from team sites, how the data model works, what the differences are between SPSite and SPWeb objects, how, when and why to do impersonation, how data is stored in and retrieved from lists, and getting a handle on the ins and outs of code access security will be time well spent. Furthermore, one needs to work with SharePoint for a while to have an idea of how users are going to interact with the custom web parts being created. How can a person effectively design a portal application if they’ve never struggled with the default navigation controls, created site collections and subsites, managed portal area security, configured search, created custom views, added calculated fields, configured cross-site groups, or put together a basic data view web part? I’m not saying that developers should be admins – that’s not their job – but they sure need to know what they’re working with before jumping in with both feet.
2. Plan for success
It’s a funny thing, but SharePoint development tends to promote a kind of “code before planning” mentality that rarely exists elsewhere in the enterprise. Developers who wouldn’t normally write a line of ASP.NET code without a dozen use cases jump right into web parts without any kind of plan whatsoever. SharePoint’s inherent advantages – unified navigation, managed presentation layer, built-in security model, user-managed hierarchy – aren’t a substitute for a well-designed application framework; in fact, they often work against the developer to emphasize weak design elements and exacerbate poor application design.
Before writing a single line of code, stop and T-H-I-N-K. What’s the right type of project - web part, server control, event handler, or web service? How will the users deploy the application? Will it be used in both WSS and SPS? Does the code require external files, such as XML and XSL, and, if so, where will they be stored and how will they be accessed? What kind of permissions are necessary to execute the various functions in the code? How will configuration parameters be stored and modified? Does the output require a user control or will the HtmlTextWriter class of RenderWebPart be sufficient? Are success/fail messages required in the GUI or Event Viewer? How will you debug and test the application?
Finally, plan your code just like you would any other enterprise application. Identify your input elements, output parameters, presentation objects, class definitions, and so forth. Map out the structure and navigation hierarchy. Determine data storage requirements. Create a specification for all the supporting elements – lists, libraries, areas, sites, etc. In other words, treat it like a normal development project and avoid the common mistakes that cause web parts to fail under any conditions other than those used in the proof of concept.
3. Know the Object Model
Nothing is more frustrating than seeing an application that works flawlessly in development get kicked back from QA because the code is dependent upon some quirky object model function. Those handy little methods that look like lifesavers in development – IsRootWeb, DoesUserHavePermissions, GetSubwebsForCurrentUser, ParentWeb – can wreak havoc in a production environment (try using IsRootWeb on a top-level portal area and watch your code get blown to smithereens). Even worse, permission-dependent functions, like GetPermissionCollectionFromWeb, don’t work at all for non-admin users, requiring tricky account impersonation techniques.
The best way to avoid these common pitfalls is to test, test, test in the best simulation of a real-world environment possible. Make sure that the development SharePoint server has accounts for at lest each level of built-in security (and any custom security groups required by the application). Deploy code in the Home area, top-level portal areas, subareas, site collections (parent sites) and subsites. Above all, consider how the user *might* implement the code not how you originally intended it to be used.
4. Log Application Events
Debugging code is no easy task in SharePoint; it’s not always possible to run code on the local development server or virtual machine, the standard error messages are cryptic at best and nearly useless in many instances, and asynchronous code execution (event handlers, for instance) will give even the most seasoned .NET developer nightmares. One simple yet effective method for debugging in SharePoint is to write success and fail messages to the event log during development and testing. Using the WriteEntry method of the System.Diagnostics.EventLog class, developers can bypass the SharePoint safemode parser and STSFLTR ISAPI filter and write messages directly to the event log. This is a handy method for isolating code errors during development; just be sure to remove the event log code before moving into production (although it might be a good idea to leave some level of error logging in the application, especially if it is an event handler or other async process).
5. Code Only as a Last Resort
It sounds strange but writing custom code should be the last resort in any SharePoint deployment, large or small. Think about it – code is expensive to write, deploy, and maintain. In most instances, the original developer isn’t going to be around when the code breaks or fails to run after the latest batch of service packs and updates. No matter how good they are, nobody can fully comment a batch of code so that those who come behind them can just pick it up where they left off. But worst of all, custom code cannot be learned, deployed, managed or improved upon by the average portal user.
Out of the box, SharePoint provides a rich application framework that enables users to create dynamic collaboration spaces without any programming. It never ceases to amaze me how many creative solutions users come up with just using the stock web parts and lists. As developers, our first instinct when presented with a problem is to write code to solve it but users don’t think that way; give them a chance to create a solution on their own and you may be surprised what they come up with, especially once they learn how to use Data View Web Parts. Concentrate on writing code only where it’s really needed so developers can spend their valuable time solving really hard problems without getting bogged down writing throw-away web parts and duplicating built-in functions.
6. Lists Rule
The secret to SharePoint’s power and flexibility is the list object. The reason the product has been so successful where others have floundered (think Lotus Notes and PeachTree) is that it empowers users to create their own data-driven applications without even knowing how to spell ‘database’. But lists are more than Databases for Dummies – they can be a developer’s best friend. Need a datatable to store input parameters? Use a list. Need a sortable, filterable grid to display query results? Lists do it automatically. Need to store/retrieve file objects like XML configuration files? Document libraries have it covered. Need an automated method for launching processes in response to user-driven events? Attach an event handler to a document library.
In SharePoint it’s all about using what you have and not recreating the wheel. If the design includes any sort of data input/output requirements, stop and think how a list can serve this purpose before writing to any XML files in the /bin directory or attaching to an external database. Lists can be a tremendous time saver and, even better, can involve the user in the data management process, requiring less code and generating more interactivity.
7. Don’t Fear the Database
I know this is going to be controversial but I’ve never agreed with the misguided mantra promulgated by SharePoint product managers and evangelists of “Don’t touch the database”. What rubbish. Are we in the business of providing value to the customer or giving sermons on “supportability”? Show me one instance of how reading from the database will blow up a portal and I’ll be glad to reconsider – but I have yet to see one (please note that I am talking ONLY about reading from the database – writing to it directly is a really bad idea and should be strenuously avoided). And before you flame me with a zillion emails on the subject, stop and ask yourself why it’s wrong to read from the SharePoint database but OK to read from the MCMS data store? Is there some evil genie guarding _SITE that’s going to awaken and eat all our lists for breakfast if we query the Webs table? And here’s the real kicker – BizTalk can flood the SQL server with SELECT statements while executing a workflow process but my little navigation control is going to bring SharePoint to a screeching halt??? I think not.
The truth of the matter is that the object model only goes so far. Sometimes the right way to get information to the user is to fetch it from the database; sometimes it’s the ONLY way (think full-blown, drop-down, security-trimmed portal navigation, for instance, or rolling up list data across multiple portals/site collections). Of course, a good developer will follow good data access practices, minimizing redundant calls across the network, closing connections in a timely manner, doing advanced sorting and filtering in dataviews, and so forth. The database is to be respected but never feared; in fact, learning how the data model works in SharePoint can help one to develop richer, more efficient and flexible web parts.
Naturally, these techniques are not a comprehensive guide to developing in SharePoint but they are a good starting point for beginners (and a timely refresher for those with a few web parts under their belts). Learn to be a better SharePoint developer and everyone wins – fellow programmers, project managers, administrators, and, most importantly, the users who have to live with our applications on a daily basis.
Friday, March 31, 2006
TechEd 2006 SharePoint Sessions
If you are planning to attend TechEd 2006 in Boston then you should drop by the web site and vote for the SharePoint Birds of a Feather sessions. Heather Solomon and Andrew Connell each have one and and Bil Simser has several (and if you don’t already read their blogs then get over there now and add them to your newsreader pronto). Don’t let the SQLers get all the exposure – show ‘em we want us some SharePoint!!!
Tuesday, March 28, 2006
Who Am I? Demystifying SharePoint Impersonation.
The SharePoint security model makes it easy to programmatically execute code within the current user context. Just write and deploy your web part and it runs in the security context of the logged in user. There are even built-in functions that take advantage of the user’s security context – such as GetSubwebsForCurrentUser() – without requiring any extra coding on our part. Simple yet effective.
But what about those times when you need to execute code with permissions greater than that of the current user (like instantiating a site collection or enumerating list permissions)? Well, that’s not quite so easy, but it’s not that hard, either – Lois and Clark have an excellent post on various methods for altering security context. There’s also Todd Bleeker’s method and Maurice Prather’s approach. And just to cook your noodle a bit more, what about those times when you not only need to run in an administrative context but you also need to check permissions for the current user? So much for simple.
Thankfully, there is a relatively straightforward way to achieve both objectives. By combining a bit of RevertToSelf() with AppDomains and SPRoleCollections, we can run securely in an administrative context without hard-coding account details, force SharePoint to use the credentials we give it, and verify that users have access to the content being displayed. In fact, this is the only way I’ve found to enforce impersonation in all instances.
I must admit to not being the world’s greatest programmer, so I spent quite a bit of time flipping between each code snippet trying to piece together a solution (code wizards like Simser and Tielens can do this stuff in their sleep but I seem to be lacking an equivalent concentration of grey matter). To save you from the same headaches, here’s the code in full with a complete description afterwards.
using System;
using System.Data;
using System.Text;
using System.Drawing;
using System.Collections;
using System.Configuration;
using System.Web;
using System.Web.UI;
using System.Web.UI.WebControls;
using System.Security;
using System.Security.Policy;
using System.Security.Principal;
using System.Security.Permissions;
using System.Runtime.InteropServices;
using Microsoft.SharePoint;
using Microsoft.SharePoint.Utilities;
using Microsoft.SharePoint.WebPartPages;
using Microsoft.SharePoint.WebControls;
namespace MyNameSpace
{
public class MyClass : System.Web.UI.Page
{
[DllImport("advapi32.dll")]
static extern bool RevertToSelf();
private void Page_Load(object sender, System.EventArgs e)
{
WindowsIdentity objOriginalUser = WindowsIdentity.GetCurrent();
RevertToSelf();
WindowsIdentity.GetCurrent().Impersonate();
try
{
AppDomainSetup objAppDomainSetup = AppDomain.CurrentDomain.SetupInformation;
Evidence objEvidence = AppDomain.CurrentDomain.Evidence;
AppDomain objMyAppDomain = AppDomain.CreateDomain("MyAppDomain", objEvidence, objAppDomainSetup);
SPSite site = new SPSite(<portal URL>);
site.CatchAccessDeniedException = false;
SPWeb web = site.AllWebs[<site URL>];
SPPermissionCollection perms = web.Permissions;
SPUserCollection users = web.Users;
foreach (SPUser user in users)
{
if (objOriginalUser.Name.ToLower() == user.LoginName.ToLower())
{
SPRoleCollection roles = user.Roles;
SPListCollection lists = web.Lists;
foreach (SPRole role in roles)
{
foreach (SPPermission perm in perms)
{
if (role.ID == perm.Member.ID)
{
if
(role.PermissionMask.ToString().IndexOf("ViewPages") != -1 role.PermissionMask.ToString().IndexOf("FullMask") != -1)
{
// TODO: Insert your code here.
}
}
}
}
}
}
}
catch(System.UnauthorizedAccessException ex)
{
Response.Write(ex.Message.ToString());
}
}
AppDomain.Unload(objMyAppDomain);
}
}
Before we go any further, allow me to point out that the code sample is probably causing real .NET developers to pull their hair out – for one, I don’t know all their code optimization techniques, and for another, I’m trying to keep it simple so this post doesn’t run off the end of the page, spill over the keyboard, and end up in the reader’s lap. So have some mercy and don’t flame me too badly but do post any tips that will help make the code better. Also, note that throughout this post I’ve tried to use the same variable names and syntax as the original articles to avoid confusion.
Now on to business. In the above example, we are instantiating a new SPWeb object in the Administrator context and checking the permissions for the actual logged-in user for the target site. The first step is to make sure we have the proper references so be sure to add the proper DLL’s to your project and add all the required ‘using’ statements (you may need more or less depending upon what your application does).
using System;
using System.Data;
using System.Text;
using System.Drawing;
using System.Collections;
using System.Configuration;
using System.Web;
using System.Web.UI;
using System.Web.UI.WebControls;
using System.Security;
using System.Security.Policy;
using System.Security.Principal;
using System.Security.Permissions;
using System.Runtime.InteropServices;
using Microsoft.SharePoint;
using Microsoft.SharePoint.Utilities;
using Microsoft.SharePoint.WebPartPages;
using Microsoft.SharePoint.WebControls;
Next, we need to import the ‘advapi32.dll’ in order to facilitate impersonation of user accounts.
[DllImport("advapi32.dll")]
static extern bool RevertToSelf();
Once we have the proper resources, we can impersonate the administrative user account. The RevertToSelf() function returns the user credentials of the account under which the SharePoint application pool runs in IIS (MSSharePointPortalAppPool in a default installation). If you are running your portal under a different context, now would be a good time to change it to a local admin account that is also a SharePoint administrator. The biggest advantage of this method is that it does not required any sensitive information (such as passwords) to be stored in clear text; the credentials are specified in the IIS settings for the virtual server.
WindowsIdentity objOriginalUser = WindowsIdentity.GetCurrent();
RevertToSelf();
WindowsIdentity.GetCurrent().Impersonate();
The first line gets the current user account for later use. The second calls the Application Pool credentials and the third sets the impersonation context to that account (omitting it will generate an Access Denied error).
Once we have the proper credentials in place, it’s necessary to create a unique application domain to run our code in. SharePoint has a nasty quirk wherein it insists on using the currently logged in user credentials no matter how many times you tell it otherwise. The fix for this is to create an application domain wrapper for the subsequent code, in effect fooling the SharePoint object model into thinking your web application is actually a console application (see Maurice’s post for a full explanation).
AppDomainSetup objAppDomainSetup = AppDomain.CurrentDomain.SetupInformation;
Evidence objEvidence = AppDomain.CurrentDomain.Evidence;
AppDomain objMyAppDomain = AppDomain.CreateDomain("MyAppDomain", objEvidence, objAppDomainSetup);
Now that we have the proper credentials and domain in place we can move on to the actual SharePoint code. For this very basic example, we first instantiate a new site based on the root portal, then create an SPWeb object for a site so we can get its user and permission collections. Note the ‘CatchAccessDeniedException() method – this prevents authentication dialog boxes from appearing if the login somehow fails.
SPSite site = new SPSite(<portal URL>);
site.CatchAccessDeniedException = false;
SPWeb web = site.AllWebs[<site URL>];
SPPermissionCollection perms = web.Permissions;
SPUserCollection users = web.Users;
Earlier we captured the original user credentials before impersonating the admin account. We can now use that information to compare against the list of site users to see if the currently logged-in user has permissions to access the site. First, we’ll check to see that the user names match:
if (objOriginalUser.Name.ToLower() == user.LoginName.ToLower())
Then we’ll get the security role collection for the site:
SPRoleCollection roles = user.Roles;
Then we loop through the security roles and permission collections to see if the role ID for the current user matches the Member ID in the permissions table for the site. If it does, then we check to see if the user has either the ViewPages right or, if the user is an administrator, the FullMask right (rights are cumulative for Web Designers, Contributors, Readers and all other roles except Administrators, who simply have the ‘FullMask’ permission).
foreach (SPRole role in roles)
{
foreach (SPPermission perm in perms)
{
if (role.ID == perm.Member.ID)
{
if
(role.PermissionMask.ToString().IndexOf("ViewPages") != -1 role.PermissionMask.ToString().IndexOf("FullMask") != -1)
Assuming the user credentials are accepted, you may now execute whatever code you desire with confidence that the user has sufficient permissions to view the specified content. Once the code has finished executing it’s a good idea to destroy the application domain you created and, if you wish, revert back to the original user context.
AppDomain.Unload(objMyAppDomain);
objOriginalUser.Impersonate();
Of all the methods that are available for running code under an administrative context in SharePoint, this combination of impersonation and application domains is the only one that I’ve found works in every situation I’ve tried.
Saturday, March 18, 2006
SharingPoint Update
You may have noticed that I haven’t been blogging much lately. I’ve been swamped with projects, starting with a complete, top-to-bottom site customization at the beginning of the year that I completed in just two weeks, followed by a month in Indianapolis in February, a few days in Baltimore, then right on to a project in Dallas. In between I redesigned a company web site for a friend, did my corporate taxes, and emptied a storage bin full of old stuff. Whew!
During this time I’ve been doing A LOT of custom development in .NET – web parts, object model code, server controls, custom lists, the whole nine yards. As most people know I’m not the greatest programmer in the world and only know enough C# to be really dangerous so it’s been quite the learning experience. Here’s a sample of what I’ve been up to:
During this time I’ve been doing A LOT of custom development in .NET – web parts, object model code, server controls, custom lists, the whole nine yards. As most people know I’m not the greatest programmer in the world and only know enough C# to be really dangerous so it’s been quite the learning experience. Here’s a sample of what I’ve been up to:
- Dynamic drop-down portal area navigation server control
- Custom list query/XML rendering administration pages
- Visio design template for SPS/WSS deployments
- Custom site navigation control/web part with security trimming
- Advanced customization best practices document
- Document library event handlers (not started yet)
- List search pages
Wednesday, March 01, 2006
Extreme SharePoint Design: Modifying 'Grouped By' Headers, Part 2
Creating a grouped list in SharePoint is easy – just Modify Settings and Columns, Create View, and select the column(s) to group on; however, getting the grouping to sort and display the way you want isn’t quite so simple. By default, SharePoint sorts alphabetically and there aren’t any options to hide group headers, style them individually, or change the layout.
One of the most common requirements for grouped listings is to create a manual sort mechanism to circumvent the built-in alphabetical sort. This is easily done by adding a new field with a numerical value and assigning each list entry to the appropriate identifier. When a new view is created, the list is first grouped by the sort field and next by whatever content field is appropriate. The problem is that the user sees the sort field in the first group header and there’s no way to turn it off in the list settings.
There are two ways to solve this problem. You can modify the SCHEMA.XML file for the list type and change the CAML to render the groupings the way you want them (read this post to learn how). The issue with this method is that it is a global change; all lists of the same type in the site definition will be changed. Alternatively, you can override the default styles using a web part which hides or alters the appearance of the stock group header on a page by page basis.
Each header level is contained within a table row that inherits the ‘ms-gb’ (first group header) or ‘ms-gb2’ (second group header) style from OWS.CSS. To override these styles, add a Content Editor Web Part (CEWP) to the page, open the Source Editor in the tool pane, and add your own stylesheet entry. For example, to hide the first group header row entirely (dark gray bar in default theme), enter the following:
<style>
.ms-gb{display:none}
</style>
Disable the CEWP’s ‘Display on page’ setting (under ‘Layout’ in the tool pane) to hide the web part, save it and the group header disappears. Because the CEWP is rendered after the default stylesheet references in the site definition page, it overrides the settings in OWS.CSS following the cascading rules of CSS (last reference takes precedence). Technically, the header still exists, users just can’t see it. Use the same method to apply font colors, background images, margins, and any other CSS style properties.
Unfortunately, this method doesn’t work as well for altering the actual text of the header entry (i.e. removing the ‘[Group Name] :’ prefix). You can use JavaScript to achieve this effect by altering the innerHTML property of each header and using the getElementById method, but you’ll have to apply it individually to each header ID and they’re not always the same from page to page. Plus, JavaScript in CEWP’s often causes unpredictable results (such as preventing web parts from being saved or disabling tool bar functions). If you do plan to use JavaScript on a web part page, it’s always best to store the script in a document library as a .js file or as part of an HTML page then call that page using a Page Viewer Web Part.
Monday, February 13, 2006
Extreme SharePoint Design: Dynamic Style Sheets
Both WSS and SPS provide mechanisms for altering the presentation of pages using custom style sheets. While WSS provides a relatively simple template structure for improving the stock look and feel on a site-by-site basis, SPS customizations must be applied on a portal-wide basis (using the custom style sheet field in Site Settings) or for each individual site definition. If you employ user controls in your site definitions to create custom headers, navigation elements, etc. this means that each site definition must reference it's own separate control. This makes code maintenance difficult and time consuming.
But perhaps the most glaring deficiency in employing custom styles is the lack of style continuity in administration pages. No matter how eye-catching your design is, as soon as the user attempts to manage portal content, change settings, create a list, or do one of a hundred other administrative tasks, the styles revert back to the boring out-of-the-box template (this holds true for both WSS sites and SPS portal areas).
In order to overcome this limitation, a method of dynamically switching styles for sites, areas, and administration pages is needed Fortunately, the SharePoint object model provides several functions that can be leveraged to create a style switcher based on site definition, site template, user id, group, or any number of other parameters depending upon your requirements.
To begin with, if you are not already employing user controls in your custom site definitions, you should consider doing so as soon as possible. They are flexible, reusable, and easy to maintain. Perhaps most importantly, they also provide access to server-side scripting which is disabled on standard ASPX pages within SharePoint. Creating a user control is simple - modify a base portal page (such as the default page for a cloned site definition) until you have the desired look and feel, then extract that code into a blank HTML page with all <HTML>, <HEAD> and <BODY> tags removed. Add the proper registrations to the top of the page (see example below) and save it into a centrally-accessible directory (such as /bin or /_layouts/1033) with an .ASCX extension. In the default page, add a page registration for the file and a code reference in the body of the page and you're done. You can now reference the user control from any portal page - changes made within the control will be viewable on all pages which reference it. Now you only one page to maintain instead of dozens.
Here's an example of a user control (header.ascx) that creates a custom portal header:
<%@ Control Language="c#" AutoEventWireup="false" TargetSchema="http://schemas.microsoft.com/intellisense/ie5" %>
<%@ Register Tagprefix="WebPartPages" Namespace="Microsoft.SharePoint.WebPartPages" Assembly="Microsoft.SharePoint, Version=11.0.0.0, Culture=neutral, PublicKeyToken=71e9bce111e9429c" %>
<%@ Register Tagprefix="SPSWC" Namespace="Microsoft.SharePoint.Portal.WebControls" Assembly="Microsoft.SharePoint.Portal, Version=11.0.0.0, Culture=neutral, PublicKeyToken=71e9bce111e9429c" %>
<%@ Register Tagprefix="SharePoint" Namespace="Microsoft.SharePoint.WebControls" Assembly="Microsoft.SharePoint, Version=11.0.0.0, Culture=neutral, PublicKeyToken=71e9bce111e9429c" %>
<table width="100%" border="0" cellpadding="0" cellspacing="0" ID="Table2">
<tr>
<td width="100%" coldiv="4" height="14" class="spsHeader_Banner"></td>
</tr>
<tr>
<td width="40" height="80" align="center" valign="middle" class="spsHeader_Logo"><img src="/_layouts/images/Header_Left.gif"></td>
<td width="100" valign="middle" class="spsHeader_Name"><SPSWC:WebProperty Property="SiteTitle" runat="server" /></td>
<td width="99%" valign="bottom" class="spsHeader_Title">Home</td>
<td width="350" valign="bottom" class="spsHeader_Actions">
<table height="100%" width="100%" border="0" cellpadding="0" cellspacing="0" ID="Table3">
<tr>
<td coldiv="2" height="99%" valign="top" align="right" class="spsHeader_MySite" nowrap ><SPSWC:PageHeader id="PageHeaderID" runat="server" PageContext="SitePage" ShowTitle="false" Mode="LinksOnly" /></td>
</tr>
<tr>
<td width="75" valign="middle" align="right" class="spsHeader_Search">Search</td>
<td valign="middle" width="99%" align="right" class="spsHeader_SearchBox"><SPSWC:RightBodySectionSearchBox id="RightBodySectionSearchBoxID" runat="server" SearchResultPageURL="SEARCH_HOME" FrameType="None" /></td>
</tr>
</table>
</td>
</tr>
<tr>
<td coldiv="4" width="100%">
<div id="spsHeader_NavMenu">
<SPSWC:CategoryNavigationWebPart runat="server" id="HorizontalNavBar" />
</div>
</td>
</tr>
<tr>
<td height="1" coldiv="4" width="100%" class="spsHeader_Separator"></td>
</tr>
</table>
Note the page registrations at the top of the file - these provide access to SharePoint's built-in functions and the object model. On the default page, add a reference to the control like this:
<%@ Register Tagprefix="CUSTOMUC" Tagname="Header" src="/bin/Header.ascx" %>
Then insert the control reference in the body of the page, like so:
<CUSTOMUC:Header id="Header" runat="server"></CUSTOMUC:Header>
Once you have the control in place, you can add code to dynamically change style sheets. For example, let's assume that you have a style sheet for each standard portal definition - custom_sps.css, custom_msite.css, custom_topic.css, custom_news.css, and so on. In order for the header to have a different look for each area, the style sheet reference in the file must change based on which site definition the page being viewed is derived from. To make this happen, add the following code to the top of the control, just after the page registrations:
<%
if (SPControl.GetContextWeb(Context).WebTemplate == "SPS")
{
Response.Write("<link rel='stylesheet' type='text/css' href='/_layouts/" +
System.Threading.Thread.CurrentThread.CurrentUICulture.LCID + "/styles/custom_SPS.css'>");
}
else if (SPControl.GetContextWeb(Context).WebTemplate == "SPSMSITE")
{
Response.Write("<link rel='stylesheet' type='text/css' href='/_layouts/" +
System.Threading.Thread.CurrentThread.CurrentUICulture.LCID + "/styles/custom_msite.css'>");
}
else if (SPControl.GetContextWeb(Context).WebTemplate == "SPSTOPIC")
{
Response.Write("<link rel='stylesheet' type='text/css' href='/_layouts/" +
System.Threading.Thread.CurrentThread.CurrentUICulture.LCID + "/styles/custom_spstopic.css'>");
}
else if (SPControl.GetContextWeb(Context).WebTemplate == "SPSNEWS")
{
Response.Write("<link rel='stylesheet' type='text/css' href='/_layouts/" +
System.Threading.Thread.CurrentThread.CurrentUICulture.LCID + "/styles/custom_news.css'>");
}
else
{
Response.Write("");
}
%>
To add additional site definitions, insert an extra "else if" statement for each definition name (WSS sites use the STS definition). The key to this script is the value of GetContextweb(Context).WebTemplate method. This method returns the site definition name for the page being viewed. For individual WSS site collections, you can also use GetContextWeb(Context).Site.RootWeb method. What makes this method even more useful is that the site definition/root web value persists on administration pages (see Extreme SharePoint Design: Customizing SharePoint Administration Pages for detailed instructions on how to employ user controls on administration pages).
Pages which call the new header will inherit the base styles, the custom styles applied at the portal level, and the definition-specific file referenced in the dynamic style sheet script. Due to the cascading principle of CSS, the last-referenced file takes precedence, insuring that the proper style is displayed. By utlizing dynamic style sheet switching you will create a more consistent user experience and reduce the amount of maintenance required for custom site definitions.
Thursday, January 26, 2006
Extreme SharePoint Design: Customizing SharePoint Administration Pages
Administration pages in SharePoint are often the Achilles heel of a customized portal design – they exist outside of the site definition framework, they don’t inherit templates, and they implement a confusing array of shared code structures. This can create usability issues as users switch from a cohesive design on default and list pages to the default GUI and navigation when trying to create a new list or add an alert.
Depending on your design, customizing administration pages can quickly become a nightmare – if just modifying the header is not enough then you’re in for a bumpy road ahead. Here are a few tips that can help you get from stock to custom without the need for a morphine I.V. drip:
Primary Page Structures
There are 215 .ASPX files in the /layouts/1033 directory. Seventy-eight percent of these fall into one of two primary code structures. For simplicity, we’ll call them the ‘SPS’ style and ‘WSS’ style. The SPS style relies upon a server-control structure to render page content; the WSS style uses more traditional HTML code to display content.
The following code renders the page header in the SPS style:

This is how the same header is retrieved in the WSS style:

The most important difference between the two files is the WSS style’s utilization of the AlternateHeader property. The code first checks to see if an alternate header exists – either PORTALHEADER.ASPX or ALTERNATEHEADER.ASPX – and, if so, retrieves the code from the file and renders it; if not, it renders the code between the if…else blocks. This is a useful mechanism because the alternate header files function the same way as a user control – a central file that can be modified to match the new portal design scheme and is accessed from many pages – but it’s only applicable to the WSS style. How do we apply this same concept to the SPS style?
User Controls
Directly modifying the SPS style pages to replace the header is pretty straightforward – just replace the contents between the SPSWC:PageHeader tags (if you aren’t going to use the SPSWC:CategoryNavigationWebPart control in your code, be sure to leave it in place and comment it out). The problem is that there are 67 of these files so maintaining the customized code can become an issue. The solution is to implement a user control to replace the default code and duplicate the alternate header functionality. But there is a catch (naturally).
Pages in the /layouts/1033 directory can utilize external code files but only if they reside in the same directory. So, unlike site defintion files, for which user controls are normally stored in the virtual server /bin directory, any controls created for administration pages must be stored in /layouts/1033; otherwise, the process is the same. Create the replacement code, save it in an .ASCX file in the /layouts/1033 directory, and reference it from each administration page.
First, remember that when creating a user control you need the correct page registrations for any code contained within the file. The standard registrations are:
<%@ Control Language="c#" AutoEventWireup="false" TargetSchema="http://schemas.microsoft.com/intellisense/ie5"%>;
<%@ Register Tagprefix="WebPartPages" Namespace="Microsoft.SharePoint.WebPartPages" Assembly="Microsoft.SharePoint, Version=11.0.0.0, Culture=neutral, PublicKeyToken=71e9bce111e9429c"%>
<%@ Register Tagprefix="SPSWC" Namespace="Microsoft.SharePoint.Portal.WebControls" Assembly="Microsoft.SharePoint.Portal, Version=11.0.0.0, Culture=neutral, PublicKeyToken=71e9bce111e9429c"%>
<%@ Register Tagprefix="SharePoint" Namespace="Microsoft.SharePoint.WebControls" Assembly="Microsoft.SharePoint, Version=11.0.0.0, Culture=neutral, PublicKeyToken=71e9bce111e9429c"%>
<%@ Register Tagprefix="Utilities" Namespace="Microsoft.SharePoint.Utilities" Assembly="Microsoft.SharePoint, Version=11.0.0.0, Culture=neutral, PublicKeyToken=71e9bce111e9429c"%>
You’ll also need to register the new user control at the top of each administration page, like this:
<%@ Register Tagprefix="CUSTOMUC" Tagname="spsPortalHeader" src="spsPortalHeader.ascx"%>
You can then call the code from within the page by placing the user control reference between the SPSWC:TopPageSection tags. For example:
<CUSTOMUC:spsPortalHeader id="spsPortalHeader" runat="server"></CUSTOMUC:spsPortalHeader>
Of course, you still have to modify all 67 SPS style pages but by implementing user controls you only have to do this once; after that, you make changes only to the .ASCX file and they will be propagated automatically.
Beyond Headers
Sadly, replacing headers is the easiest part of administration file customization. Beyond that you enter into the realm of painful line-by-line replacement. WSS style pages are a bit easier as you have direct access to the page body code, which can be edited easily enough (user controls can also save you some headaches here), but watch out – the structures change slightly from page to page and there are often hard-coded elements (such as page titles) so be careful how much editing you do. The same can’t be said for SPS style pages – they use nothing but server controls to render code.
The good news on both fronts is that creative manipulation of style sheets can overcome most design challenges, as long as you’re willing to live with the boxy and boring standard white content area. The primary styles in play here are ms-nav, ms-navframe, ms-titlearea, ms-titleareaframe, ms-titlearealine, ms-verticaldots, ms-colspace, ms-pageidi, ms-pageidpt, and ms-pageidta. You’ll also have to deal with the stock images at the top of the left column by moving them around or making them disappear altogether. Assuming you’ve already modified the styles for the navigation frame on the left and the associated menus, you should be well on your way to improving the bland look of those finicky administration pages.
Happy SharePointing!
UPDATE: Need to get rid of that pesky image at the top of the left column in the SPS style? Try Mike Rundle's text-hiding method. Add this to your style sheet:
.ms-pageidi
{ text-align: -100px }
Image be gone! (Note: it's still there, the text-align setting just moves it off the page where it can't be seen)
Subscribe to:
Posts (Atom)